
Topics: Connecting to MIDI devices (pianos, guitars, etc.), the Python MIDI library, MIDI programming, Open Sound Control (OSC) protocol, connecting to OSC devices (smartphones, tablets, etc.), send / receive OSC messages, the Python OSC library, creating hybrid (traditional + computer) musical instruments.
In the previous chapter, we began designing unique interactive musical instruments for live performance. In this chapter, we explore how to create connections between a computer and external devices, such as MIDI controllers, synthesizers, and smartphones, via the MIDI and OSC protocols. More information is provided in the reference textbook.
Here is sample code and examples:
- MIDI input
- Process incoming MIDI notes
- Process arbitrary MIDI messages
- Create custom MIDI synthesizer #1
- Create custom MIDI synthesizer #2
- Draw circles through MIDI input
- OSC input
- OSC messages
- When an OSC message arrives, print “Hello World!”
- Process arbitrary OSC messages
- Change display color continuously via OSC
- Build a simple piano playable via OSC
- Clementine – making music with a smartphone
MIDI input
To build programs that communicate via MIDI, you need the following statement:
from midi import *
To receive input from a MIDI device, create a MIDI input object:
midiIn = MidiIn()
This opens a GUI to select a MIDI input device.
After selecting the device, your program receives MIDI messages from it, as shown here:
Process incoming MIDI notes
This sample code demonstrates how to process incoming MIDI notes. It assigns a callback function to MIDI Note-On messages. This function prints the pitch and volume of the incoming MIDI message – but it could do anything we want with this data.
These callback functions must have four parameters:
- event type (an integer)
- channel (0 – 15)
- data1 (pitch, 0 – 127)
- data2 (volume, 0 – 127)
Here is the code:
# midiIn1.py
#
# Demonstrates how to run arbitrary code when the user plays a note
# on a MIDI piano (or other MIDI instrument).
#

from midi import *

midiIn = MidiIn()

def printNote(eventType, channel, data1, data2):
   print "pitch =", data1, "volume =", data2

midiIn.onNoteOn(printNote)

# since we have established our own way to process incoming messages,
# stop printing out info about every message
midiIn.hideMessages()
Here is the output:
Process arbitrary MIDI messages
This program demonstrates how to process arbitrary incoming MIDI messages. It assigns a callback function to be called for any incoming message. This particular function explores what type of message it has received and prints out its data – however, it could do almost anything with this data. This program can process messages from any MIDI controller, such as the Akai MPK Mini keyboard, or a custom Arduino controller.
Here is the code:
# midiIn3.py
#
# Demonstrates how to see what type of messages a MIDI device generates.
#

from midi import *

midiIn = MidiIn()

def printEvent(event, channel, data1, data2):

   if event == 176:
      print "Got a program change (CC) message", "on channel", channel, "with data values", data1, data2
   elif event == 144:
      print "Got a Note On message", "on channel", channel, "for pitch", data1, "and volume", data2
   elif (event == 128) or (event == 144 and data2 == 0):
      print "Got a Note Off message", "on channel", channel, "for pitch", data1
   else:
      print "Got another MIDI message:", event, channel, data1, data2

midiIn.onInput(ALL_EVENTS, printEvent)

# since we have established our own way to process incoming messages,
# stop printing out info about every message
midiIn.hideMessages()
Here is the output:
Create custom MIDI synthesizer #1
This sample code demonstrates how to create a simple MIDI synthesizer. It assigns two callback functions, one to MIDI Note-On messages, and one to Note-Off messages. This turns an inexpensive MIDI controller (e.g., Akai MPK Mini keyboard) into a regular synthesizer. You can expand this program, by adding more functions for other MIDI events, to create a more elaborate synthesizer. You can design it to do what you wish (including generate visuals, etc.).
Here is the code:
# midiSynthesizer.py
#
# Create a simple MIDI synthesizer which plays notes originating
# on a external MIDI controller.  More functionality may be easily
# added.
#

from midi import *
from music import *

# select input MIDI controller
midiIn = MidiIn()

# create callback function to start notes
def beginNote(eventType, channel, data1, data2):

   # start this note on internal MIDI synthesizer
   Play.noteOn(data1, data2, channel)
   #print "pitch =", data1, "volume =", data2

# and register it
midiIn.onNoteOn(beginNote)

# create callback function to stop notes
def endNote(eventType, channel, data1, data2):

   # stop this note on internal MIDI synthesizer
   Play.noteOff(data1, channel)
   #print "pitch =", data1, "volume =", data2

# and register it
midiIn.onNoteOff(endNote)

# done!
Here is the output:
Another possibility is to use an AudioSample (instead of MIDI), which essentially creates a regular synthesizer:
# audioSynthesizer.py
#
# Create a simple AudioSample synthesizer which plays notes originating
# on a external MIDI controller.  More functionality may be easily
# added.
#

from midi import *
from music import *

# select input MIDI controller
midiIn = MidiIn()

# load sound
audio = AudioSample("strings - A4.wav", A4)

# create a nice envelope
env = Envelope([0, 20, 10], [0.0, 0.8, 1.0], 30, 0.6, 1200)
#env = Envelope()   # default

# create callback function to start notes
def beginNote(eventType, channel, data1, data2):

   # start this note, and loop it!!
   Play.audioOn(data1, audio, data2, 64, True, env)
   #print "pitch =", data1, "volume =", data2

# and register it
midiIn.onNoteOn(beginNote)

# create callback function to stop notes
def endNote(eventType, channel, data1, data2):

   # stop this note
   Play.audioOff(data1, audio, env)
   #print "pitch =", data1, "volume =", data2

# and register it
midiIn.onNoteOff(endNote)
Create custom MIDI synthesizer #2
This sample code demonstrates how to create a more advanced MIDI synthesizer. It extends the previous example by adding the capability to change MIDI instruments by turing one of the the MIDI controller knobs.
NOTE: To set which knob to use, find the data1 value that particular knob sends when turned (see MidiIn showMessages() function).
Here is the code:
# midiSynthesizer2.py
#
# Create a simple MIDI synthesizer which plays notes originating
# on a external MIDI controller.  This version includes a way
# to change MIDI sounds (instruments), by turning one of the
# controller knobs.
#

from midi import *
from music import *

# knob for changing instruments (same as data1 value sent when
# turning this knob on the MIDI controller)
knob = 16

# select input MIDI controller
midiIn = MidiIn()

# create callback function to start notes
def beginNote(eventType, channel, data1, data2):

   # start this note on internal MIDI synthesizer
   Play.noteOn(data1, data2, channel)
   #print "pitch =", data1, "volume =", data2

# and register it
midiIn.onNoteOn(beginNote)

# create callback function to stop notes
def endNote(eventType, channel, data1, data2):

   # stop this note on internal MIDI synthesizer
   Play.noteOff(data1, channel)
   #print "pitch =", data1, "volume =", data2

# and register it
midiIn.onNoteOff(endNote)

# create callback function to change instrument
def changeInstrument(eventType, channel, data1, data2):

   if data1 == knob:   # is this the instrument knob?

      # set the new instrument in the internal synthesizer
      Play.setInstrument(data2)

      # output name of new instrument (and its number)
      print 'Instrument set to "' + MIDI_INSTRUMENTS[data2] + \
            ' (' + str(data2) + ')"'

# and register it (only for 176 type events)
midiIn.onInput(176, changeInstrument)

# hide messages received by MIDI controller
midiIn.hideMessages()
Draw circles through MIDI input
This code sample (Ch. 9, p. 291) demonstrates how to do something more advanced with incoming MIDI messages. It draws circles on a display based on the pitch and volume of incoming MIDI notes. Each input note generates a circle – the lower the note, the lower the red+blue components of the circle color. The louder the note, the larger the circle. The position of the circle on the display is random.
Here is the code:
# randomCirclesThroughMidiInput.py
#
# Demonstrates how to generate a musical animation by drawing random
# circles on a GUI display using input from a MIDI instrument.
# Each input note generates a circle - the lower the note, the lower
# the red+blue components of the circle color.  The louder the note,
# the larger the circle. The position of the circle on the display
# is random.  Note pitches come directly from the input instrument.
#

from gui import *
from random import *
from music import *
from midi import *

##### create main display #####
d = Display("Random Circles with Sound")

# define callback function for MidiIn object
def drawCircle(eventType, channel, data1, data2):
   """Draws a circle based on incoming MIDI event, and plays
corresponding note.
"""

   global d                         # we will access the display

   # circle position is random
   x = randint(0, d.getWidth())     # x may be anywhere on display
   y = randint(0, d.getHeight())    # y may be anywhere on display

   # circle radius depends on incoming note volume (data2)
   radius = mapValue(data2, 0, 127, 5, 40)  # ranges 5-40 pixels

   # color depends on on incoming note pitch (data1)
   red = mapValue(data1, 0, 127, 100, 255)  # R component (100-255)
   blue = mapValue(data1, 0, 127, 0, 100)   # B component (0-100)
   color = Color(red, 0, blue)      # create color (green is 0)

   # create filled circle from parameters
   c = Circle(x, y, radius, color, True)

   # and add it to the display
   d.add(c)

   # now, let's play the note (data1 is pitch, data2 is volume)
   Play.noteOn(data1, data2)

# establish a connection to an input MIDI device
midiIn = MidiIn()

# register a callback function to process incoming MIDI events
midiIn.onNoteOn( drawCircle )
Here is the output:
MIDI output
To send output to a MIDI device, create a MIDI output object:
midiOut = MidiOut()
This opens a GUI to select a MIDI output device.
After selecting the device, your program can send MIDI messages to it, as shown here:
Play notes on a synthesizer
This program demonstrates how to drive an external MIDI synthesizer. It opens a connection to an external synthesizer and plays a note on it.
Here is the code:
# midiOut.py
#
# Demonstrates how to play a note on an external MIDI synthesizer.
#

from midi import *
from music import * # for C4 symbol

midiOut = MidiOut()

# play C4 note starting now for 1000ms with volume 127 on channel 0
midiOut.note(C4, 0, 1000, 127, 0)
Send arbitrary messages to a DAW
This program demonstrates how to send arbitrary messages to your DAW (or a MIDI synthesizer). It sends an All Notes Off message across all channels (to stop any playing MIDI notes). Instead, you could a play a score, or send other types of messages.
Here is the code:
# midiOut.py
#
# Demonstrates how to send arbitrary messages to an external MIDI device.
#

from midi import *

midiOut = MidiOut()

# send message for "All Notes Off" to all channels
for channel in range(16):  # cycle through all channels

   # send message for "All Notes Off" on current channel
   self.sendMidiMessage(176, channel, 123, 0)
For more information, see the standard MIDI control messages, or documentation on the particular DAW (or synthesizer).
OSC input
To build programs that communicate via OSC, you need the following statement:
from osc import *
To receive input from an OSC device, create a OSC input object:
oscIn = OscIn( port )
This object receives incoming OSC messages on port (e.g., 57110 – a port number not used elsewhere).
NOTE: For remote connections, make sure any firewall between you and the other device permit communication via this port (UPD).
OSC messages
OSC messages consist of an address and optional arguments, e.g., “/oscillator/4/frequency 440.0”:
- Address patterns look like a URL, e.g., “/oscillator/4/frequency”, “/button/1”, “slider/3”, etc. Any address is possible, as long as both OSC input and output devices use the same values. You can create your own, or use what a particular OSC device sends, e.g., TouchOSC.
- Arguments may be integers, floats, strings, and booleans. OSC messages may include an arbitrary number of arguments (zero or more).
When an OSC message arrives, print “Hello World!”
This sample program demonstrates how to run arbitrary code when an OSC message arrives. It assigns a callback function to be called anytime an OSC message arrives with the address “/helloWorld”.
# oscIn1.py
#
# Demonstrates how to run some code when a particular OSC message arrives.
#

from osc import *

oscIn = OscIn( 57110 )

def simple(message):
   print "Hello world!"

oscIn.onInput("/helloWorld", simple)
When you run this program, it outputs the following:
OSC Server started:
Accepting OSC input on IP address
xxx.xxx.xxx.xxx at port 57110
(use this info to configure OSC clients)
where “xxx.xxx.xxx.xxx” is the IP address of the receiving computer (e.g., “192.168.1.223”)
This IP address and port information is needed to set up an external OSC device, so it can send messages to this program.
Process arbitrary OSC messages
This program demonstrates how to see what type of messages an OSC device (e.g., a smartphone app) generates. It assigns a callback function to all incoming OSC messages. This function outputs the data stored in the incoming messages. This way, you can explore what type of messages (e.g., event types) an arbitrary OSC device generates. Then, you may assign different callback functions to be executed when they arrive.
# oscIn2.py
#
# Demonstrates how to see what type of messages an OSC device
# (e.g., a smartphone app) generates.
#

from osc import *

oscIn = OscIn( 57110 )

def printMessage(message):
   address = message.getAddress()
   args = message.getArguments()
   print "OSC message:", address,
   for i in range( len(args) ):
      print args[i],
      print

oscIn.onInput("/.*", printMessage)

# since we have established our own way to process incoming messages,
# stop printing out info about every message
oscIn.hideMessages()
Notice the special OSC address “/.*”
- this matches for all incoming addresses
- onInput() uses regular expressions to specify OSC addresses
- usually simple OSC addresses suffice,
- e.g., “/gyro”
- “/accelerometer”, etc.
- also note showMessages() and hideMessages().
Change display color via OSC
This program demonstrates how to use a smartphone’s movement via Touch OSC Mk1 to change the color of a display.
# changeDisplayColorOSC.py
#
# It changes display color Continuously via OSC messages.
# It works with the TouchOSC Mk1 app (with accelerometer
# messages ("/accxyz") turned on).

from osc import *
from gui import *

# create OSC input object
oscIn = OscIn( 57110 )

# create display, whose color we will adjust
d = Display()

# function to call when an OSC "/accxyz" message arrives
def setDisplayColor(message):

   global d

   # get the message arguments - x, y, z
   args = message.getArguments()
   x = args[0]
   y = args[1]
   z = args[2]

   # NOTE: Based on the particular smartphone, x, y, z values
   # may range between -2.5 and 2.5.  So, use those values to set
   # the R G B values for the color.
   red   = mapValue(x, -2.5, 2.5, 0, 255)
   green = mapValue(y, -2.5, 2.5, 0, 255)
   blue  = mapValue(z, -2.5, 2.5, 0, 255)

   # create color
   color = Color(red, green, blue)

   # and set display color
   d.setColor( color )

# associate callback function with "/accxyz" messages
oscIn.onInput("/accxyz", setDisplayColor)
oscIn.hideMessages()
Build a simple piano playable via OSC
This adapts the virtual piano example from Ch. 8 to demonstrate how to play that piano using OSC messages. This code uses the Touch OSC Mk1 app.
# iPianoSimpleOSC.py
#
# Demonstrates how to build a simple piano instrument playable
# through the TouchOSC Mk1 app.
#

from music import *
from gui import *
from osc import *

Play.setInstrument(PIANO)   # set desired MIDI instrument (0-127)

# create OSC input
oscIn = OscIn()

# load piano image and create display with appropriate size
pianoIcon = Icon("iPianoOctave.png")     # image for complete piano
display   = Display("iPiano", pianoIcon.getWidth(),
                              pianoIcon.getHeight())
display.add(pianoIcon)       # place image at top-left corner

# load icons for pressed piano keys
cDownIcon      = Icon("iPianoWhiteLeftDown.png")    # C
cSharpDownIcon = Icon("iPianoBlackDown.png")        # C sharp
dDownIcon      = Icon("iPianoWhiteCenterDown.png")  # D
# ...continue loading icons for additional piano keys


#####################################################################
# define callback functions
def playNote(message):
   """This function is called when a message about an OSC piano key arrives.
      If the OSC piano key is being pressed, it starts the corresponding note.
      If the OSC piano key is released, it stops the corrsponding note.
   """

   global display      # display surface to add icons
   global cDownIcon, cSharpDownIcon, dDownIcon

   # retrieve address and arguments
   address   = message.getAddress()
   arguments = message.getArguments()

   # now, get first argument (it may be 1.0 which means pressed, or 0.0 which
   # means unpressed)
   value = arguments[0]

   # is it the C key?
   if address ==  "/1/push1":

      # yes, so check if piano key is being pressed or unpressed
      if value == 1.0:   # is it being pressed?

         display.add( cDownIcon, 0, 1 )   # "press" this piano key
         Play.noteOn( C4 )                # play corresponding note

      else:   # it is being unpressed (value is 0.0)

         display.remove( cDownIcon )  # "release" this piano key
         Play.noteOff( C4 )           # stop corresponding note

   # is it the C# key?
   elif address ==  "/1/push2":

      # yes, so check if piano key is being pressed or unpressed
      if value == 1.0:   # is it being pressed?

         display.add( cSharpDownIcon, 45, 1 )   # "press" this piano key
         Play.noteOn( CS4 )                     # play corresponding note

      else:   # it is being unpressed (value is 0.0)

         display.remove( cSharpDownIcon )   # "release" this piano key
         Play.noteOff( CS4 )                # stop corresponding note

   # is it the D key?
   elif address ==  "/1/push3":

      # yes, so check if piano key is being pressed or unpressed
      if value == 1.0:   # is it being pressed?

         display.add( dDownIcon, 76, 1 )   # "press" this piano key
         Play.noteOn( D4 )                 # play corresponding note

      else:   # it is being unpressed (value is 0.0)

         display.remove( dDownIcon )   # "release" this piano key
         Play.noteOff( D4 )            # stop corresponding note

   # ...continue adding elif's for additional piano keys


#####################################################################
# associate callback function with OSC messages
#oscIn.onInput( ".*", playNote )         # for all incoming OSC addresses
oscIn.onInput( "/1/push.*", playNote )   # only for addresses starting with "/1/push" !!!

oscIn.hideMessages()
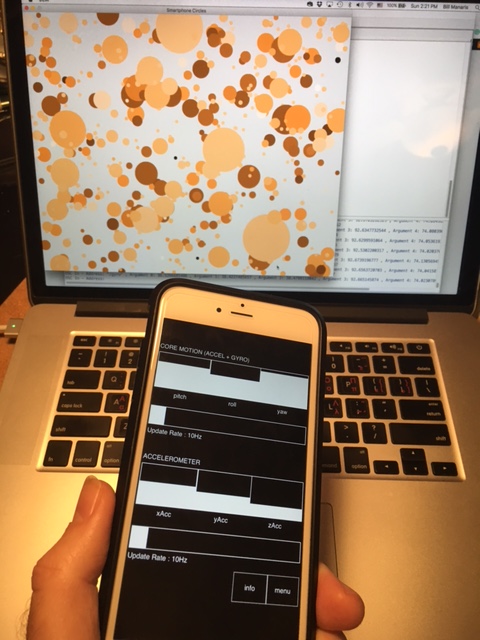
Clementine – making music with a smartphone
Clementine demonstrates how to make music with your smartphone. This code sample (Ch 9. p. 307) receives input from a smartphone, using the OSC protocol. To send OSC data from the smartphone, we used the app, TouchOSC. Other OSC apps can be used with a little modification to the code below.
Performance Instructions
This program creates a musical instrument out of your smartphone. It has been specifically designed to allow the following performance gestures:
- Ready Position: Hold your smartphone in the palm of your hand, flat and facing up, as if you are reading the screen. Make sure it is parallel with the floor. Think of an airplane resting on top of your device’s screen, its nose pointing away from you, and its wings flat across the screen (left wing superimposed with the left side of your screen, and right wing with the right side of your screen).
- Controlling Pitch: The pitch of the airplane (the angle of its nose – pointing up or down) corresponds to musical pitch. The higher the nose, the higher the pitch.
- Controlling Rate: The roll of the airplane (the banking of its wings to the left or to the right) triggers note generation. You could visualize notes falling off the device’s screen, so when you roll/bank the device, notes escape (roll off).
- Controlling Volume: Device shake corresponds with loudness of notes. The more intensely you shake or vibrate the device as notes are generated, the louder the notes are.
To summarize, the smartphone’s orientation (pointing from zenith to nadir) corresponds to pitch (high to low). Shaking the device plays a note—the stronger, the louder. Tilting the device produces more notes.
On the server side, i.e., the program you are controlling with your smartphone:
- Note pitch is mapped to color of circles (lower means darker/browner, higher means brighter/redder/bluer).
- Shake strength is mapped to circle size (radius).
- Finally, the position of the circle on the display is random.
All these settings could easily be changed. We leave that as an exercise.
Here is the program:
# clementine.py (was randomCirclesThroughOSCInput.py)
#
# Demonstrates how to create a musical instrument using an OSC device.
# It receives OSC messages from device accelerometer and gyroscope.
#
# This instrument generates individual notes in succession based on
# its orientation in 3D space.  Each note is visually accompanied by
# a color circle drawn on a display.
#
# NOTE: For this example we used an iPhone running the OSC app
# "Touch OSC". (There are many other possibilities.)
#
# SETUP:  The device is set up to be handled like an airplane in
# flight.  Hold your device (e.g., smartphone) flat/horizontal with
# the screen up.  Think of an airplane resting on top of your device's
# screen - its nose pointing away from you - and its wings flat across
# the screen (left wing superimposed on the left side of your screen,
# and right wing on the right side of your screen).
#
# * The pitch of the airplane (the angle of its nose - pointing up or
#   down) corresponds to musical pitch.  The higher the nose, the
#   higher the pitch.
#
# * The roll of the airplane (the banking of its wings to the left or
#   to the right) triggers note generation.  You could visualize
#   notes dripping off the device's screen, so when you roll/bank the
#   device, notes escape (roll off).
#
# * Finally, device shake corresponds with loudness of notes.
#   The more intensely you shake or vibrate the device as notes are
#   generated, the louder the notes are.
#
# Visually, you get one circle per note.  The circle size (radius)
# corresponds to note volume (the louder the note, the larger the
# circle).  Circle color corresponds to note pitch (the lower the
# pitch, the darker/browner the color, the higher the pitch the
# brighter/redder/bluer the color).
#

from gui import *
from random import *
from music import *
from osc import *

# parameters
scale            = MAJOR_SCALE      # scale used by instrument
triggerThreshold = 0.3              # play note if anything higher
devicePitch      = 0                # device pitch (set via incoming OSC messages)
minPitch         = -1.0             # minimum acceptable device pitch
maxPitch         = 1.0              # maximum acceptable device pitch
maxShakeAmount   = 3.0              # maximum acceptable shake value
minShakeAmount   = 0.8              # minimum acceptable shake value
shakeAmount      = minShakeAmount   # holds shake of device

##### create main display #####
d = Display("Smartphone Circles", 1000, 800)

##### create color gradients #####

#CLEMENTINE = [255, 99, 1]
BLACK = [0, 0, 0]
CLEMENTINE = [255, 146, 40]
WHITE = [255, 255, 255]

#CLEMENTINE_GRADIENT = colorGradient(CLEMENTINE, WHITE, 126) + [WHITE]
CLEMENTINE_GRADIENT = colorGradient(BLACK, CLEMENTINE, 126/2) + colorGradient(CLEMENTINE, WHITE, (126/2)+1 ) + [WHITE]

# define function for generating a circle/note
def drawCircle():
   """Draws one circle and plays the corresponding note."""

   global devicePitch, shakeAmount, minShakeAmount, maxShakeAmount, d, scale

   # map device pitch to note pitch, and shake amount to volume
   pitch = mapScale(devicePitch, -1.0, 1.0, 127, 0, scale)   # use scale
   volume = mapValue(shakeAmount, minShakeAmount, maxShakeAmount, 50, 127)
   x = randint(0, d.getWidth())     # random circle x position
   y = randint(0, d.getHeight())    # random circle y position
   radius = mapValue(volume, 50, 127, 5, 80)  # map volume to radius

   # create a red-to-brown gradient
   red, green, blue = CLEMENTINE_GRADIENT[pitch]
   color = Color(red, green, blue)
   c = Circle(x, y, radius, color, True)    # create filled circle
   d.add(c)                                 # add it to display

   # now, let's play note (lasting 3 secs)
   Play.note(pitch, 0, 3000, volume)

##### define OSC callback functions #####
# callback function for incoming OSC gyroscope data
def pitch(message):
   """Sets global variable 'devicePitch' from OSC message."""

   global devicePitch     # holds pitch of device

   args = message.getArguments()  # get OSC message's arguments

   # the 4th argument (i.e., index 3) is device pitch
   devicePitch = args[1]
   devicePitch = max(devicePitch, minPitch)      # filter out very small pitch values
   devicePitch = min(devicePitch, maxPitch)      # filter out very large pitch values

# callback function for OSC accelerometer data
def roll(message):
   """Check if passed roll threshold, if so then play note."""

   global triggerThreshold

   args = message.getArguments()  # get the message's arguments

   # get sideways shake from the accelerometer
   roll = args[0]    # using xAccel value (for now)

   # is roll large enough to generate a note?
   if abs(roll) > triggerThreshold:
   drawCircle()    # yes, so create a circle/note

# callback function for incoming OSC gyroscope data
def shake(message):
   """Sets global variable 'shakeAmount' from OSC message."""

   global shakeAmount, maxShakeAmount

   args = message.getArguments()  # get OSC message's arguments

   # the 3th argument (i.e., index 2) is device shake
   shakeAmount = args[2]
   shakeAmount = abs(args[2])
   shakeAmount = min(shakeAmount, maxShakeAmount) # filter out very large values
   shakeAmount = max(shakeAmount, minShakeAmount) # filter out very small values

def processOSC(message):
   pitch(message)
   roll(message)
   shake(message)

##### establish connection to input OSC device (an OSC client) #####
oscIn = OscIn( 57110 )    # get input from OSC devices on port 57110

# associate callback functions with OSC message addresses
oscIn.onInput("/accxyz", processOSC)

oscIn.hideMessages()
Using OSC you can design innovative performance projects, where you might allow many OSC clients (e.g., smartphones in the audience) control aspects of your performance on stage. This allows you to build sophisticated musical instruments and artistic installations.
Monterey Mirror – a hybrid instrument
Here is an example of a hybrid instrument, called Monterey Mirror. Monterey Mirror consists of a MIDI instrument (here a guitar) and a computer. This is an experiment in interactive music performance, where a human (the performer) and a computer (the mirror) engage in a game of playing, listening, and learning from each other.
Additionally, you may create new musical instruments, which may consist of smartphones and or tablets that somehow drive, guide, or contribute to the making of sound. For more information, see the reference textbook.
